


Game Research / Mood Boards

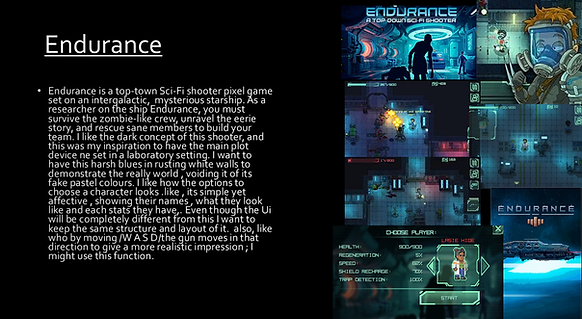
The main thing i was inspired by in this game was the play style by using they mouse to flip your character and shoot.
The pixel style of idle sprites was the main inspiration i wanted to emulate in my game


I wanted to take away the idea of turning red when you get hit by an enemy. Maybe in the future having the character look more damaged when at a certain health.
The biggest inspiration for me was the tag team mechanic were you team mate can come in to help when you need it. I will implement this in my unique mechanic.


I wanted the idea of custom idles in fights to present a characters personality.

This is my Gantt chart, this is to help with time management. An example for how this is helpful is it shows what would take the most work to complete. E.G. one thing it shows on here is that sprite work is the main thing that will take most of my time, due to my primary goal being more visual focus as my selling point. By putting the coding basic functions near the beginning i know that after doing the basic research and ideas this will be the starting point for my official project. On the other hand ,the mood board had a shorter deadline so i wouldn't have to ether do them later or spend to much time on them to make my time more variable.
One
Sheet
G
D
D

Coding
This section is all based on all coding I did for this project.

Describe your image
Describe your image
I found this stage of the coding easy since we had been giving a basic coding layout . This meant this portion was done quickly and easily. I learned the important of Parents in coding . When parenting you create a base for future children to take off and adjust without needing to re do code constantly.

I found this part a little difficult due to having issues on the image scale by them enlarging and stretching. I fixed this by adding an image_scale code to help them fit into the map. With feedback from my peers i increased the speed of the spawn to make the emeny appear faster , they said this would make my gam emore challenging.
Enemy Spawn
After adding basic enemy movement I wanted to make them spawn randomly and at a certain pace. I coded a new object called Obj_enemyspawn which will place ether a red or purple slime every 4 seconds. By doing this oi create variety to my game and make it more entertaining by having them constantly come out until the player dies.

Shooting
•To make this a top-down shooter you must have a shooting mechanic , so by clicking the right mouse key you will shoot one bullet. After coding the basic shoot, I coded collision to the enemy's so they can react to being shot , even though they have no health, yet this was just a test to see if they would react. This states , when bullet collides with enemy after (x) hits it will
destroy itself. When destroyed it has a chance to drop health
or an ammo pack. By having this random drop system, it makes the player more alert to see if An enemy has dropped ether more ammo or more health to progress the game. The ability to shoot with a left key press was inspired with my research of the game Endurance.

I found this stage of development quite easy since we all were giving a base on how shooting works. This meant i understood how bullets collide with an object/enemy. I also learnt the importance of IF statements , they work by creating a true or false statement, after else is executed, otherwise the initial statement is executed


Gun showcase
Video showcasing shooting

Player Movement
Video showcasing walking
•Next, I programmed the ability to move the player left to right and up and down. By using the arrow keys, you can move the player ( at the time she was a static pose until I coded the animations)
This basically just means when (x) key is pressed character will move (x) way. This movement was inspired by my Omori research.

This give the illusion that she is slowly gliding backwards
Flip Movement (both)
Now that I have put in basic movement for both player and enemy, I wanted to elevate my game by having them both flip and or turn to where the cursor is placed. I did this by adding the code below into my player and EnemyParent . The code below means when the mouse cursor is on the left side of the screen the characters will flip to face left but if its on the right side of the screen it will face right.
This part was the essayist in the project by far. By imputing this simple code I can make my player follow the arrow movement and create a working movable player. However , to improve next time ill program her to move with the [W A S D ] keys due to feedback of the arrow keys being confusing.

This video show what the flip in both characters looks like
This part was quite difficult ; the main reason being that most of the time both player and enemy would either increase or decrease in scale causing weird stretched out sprites and by figuring out that the image_scale had to be changes for them both to fit correctly in the Room it worked without the weird stretching. I learnt however, that image_scale is important to keep track of to make sure sprites don't glitch out in the Rooms.
Code of damage


Taking Damage
My next step with this top down shooter was to add damage for the player and expand more on enemy damage. The code states , when the enemy collides with the player the player will lose there CurrentHP by (x) amount. On the other had , it also states when player bullets collide with enemy , enemy loses (x) CurrentHP. Once player CurrentHP = 0 the game will end. Something added later was a simple hurt animation and code. When player is hit, them sprite will turn red for a few seconds. I did this so it would make the player know when they have taken damage
Video of damage mechanic
I found this part a little difficult. finding the coded to make the sprite turn red when hit took a while but i'm happy with the out come. I wanted to emulate how you have a how you turn red when hit like the game Cult of the lamb .To improve for next time I will see if i can implement a small sound to indicate they were hit. This will help the player from an audible standpoint and to make them more engrossed in the game by having them listen closely for a pain sound.

Health-Bar
To make the health packs and instance destroy work I needed to add a coded (not physical) health bar to both player and enemies . I had to create a new object called “Obj_control” ( to have a control for the game that doesn’t interfere with players/ enemies) . To create a health bar, you have to add a CurrentHP , this mean when the currnenthp = 0 the character will die.To improve on my damage code I started to input a (physical) health bar for the player. A simple health bar can improve my game by telling the player how much health they have so they can make more thought out decisions without guessing before making a move. I created a new object and used a new event called DRAW. This event helps create stuff like health bars and timers by using colors and view_imports. After adding the draw event I cleaned up the players CurrentHP to maker sure it ran smoothly.

This task was quite easy due to us having a base line code , this meant I could do this bit quickly and efficiently. To improve my health bar I will make it more ascetically pleasing to match the games vibes.
video of health bar

Loot (Ammo/Health)
Ammo

To make ammo drop I have to add code to my enemy's death code. I added a chance for ether an ammo pack to drop or a small health boost to drop. I did this by adding a LootRoll event , which will 1/2 times drop ammo. To code the main ammo , I went into my Obj_Tank (the player) and added another step event for ammo, i used a simple sprite so the ammo could be seen and coded it to one. add 50 more bullets when interacted with and two be only picked up by the player. By doing this i creates tension for my game by making the person playing think of a strategy not to waste ammo. The system of needing to harbor items was inspired by Undertale and it item system.
I found this part pretty simple to add due to the fact we ad a base line on how to implement both health and ammo into a game. By having ammo drops my game is elevated due yo the player having a goal to make sure they don't run out of bullets.

Health
To make health drops I also had to go into the Obj_Tank and create a new step event used the control Parent and made the health pack a child to it so its has the same properties as the ammo and changed the variables, I kept the ability to have a random chance to drop when enemies are killed and to be picked up by the player. The main variables I changes was using the CurrentHp instead of ammo so it will only effect the player health and to add 20+ to there HP when picked up . By doing this I make my game more interesting by having a simple rng system.
I also found this part quite easy , mainly since it was a child I didn't have to remake any code and simply change the variables and sprite. To improve I might make health more scares E.G. ammo 3/4 health 1/4 to make the game more challenging


Main code for Loot

Camera
To make my game feel smoother i added a basic camera to move along with the player. By adding my desired viewpoints i input them onto my player making the camera subtly follow them. I did this to make the game feel more alive and fun. I found this part mostly easy I only struggles with finding the correct viewpoints. I added this due to feedback from peers saying it would make them more immersed in the game.


Most of my collision walls
Collision
The next main thing to code was my wall collisions, the reason for this is to make my game more realistic and not walk over the level like its a floor. I did this by creating an object called Obj_wall and adding collision to the sprite and placing it all around my level then lowering the opacity to 0. This also affects enemy's.
This was the most difficult thing in the project for me. The main reason was due to small mistakes ; such as not making the walls middle center and not changing by player and enemy sprite collisions so they can fit. This took most of my time to try and perfect. However , now I have learnt to always check my middle center is on on all my sprites and to adjust my collision masks. To improve for next time I will use what I learnt to make a smoother collision wall so the enemy's wont get stuck in one place. This was my main issue with the game and was the one that most feedback was given to fix it.

SPRITE/ART WORK
This section is all based on sprite work , regarding animation , backgrounds and UI
Idle animation
I found this part fun yet a little difficult. I wanted this to look the best as it could so i wanted to spend a lot of time on it. I'm glad i did because i think the idle animation turned out well. I was inspired by how in Undertale during battles the opponent has there own unique idle animation when waiting for your turn. I learnt that creating a plan for animations is very useful since i knew the direction i wanted to take it and didn't have to brainstorm during the production phase.
Onto how I animated it, I made a list on how many frames I wanted each animation to be - 13 frames- then did a basic sketch in the pixel art program (pixel art) and made separate layers for each body part like the face , the gun and even broke up the hair into bangs , ponytail and side parts.I then used my initial sketch as a guide for were each body part will be placed and followed it pixel by pixel. By doing this in the future for different sprites I can re uses the body parts since they had there own layers. After doing that it looks quite stiff so i went in and made the movement bouncy wee it needs to be ; her hair is and mags are extremely bouncy due to them being lighter , on the contrary her mini gun and arm are quite stiff and fall down with a thud since its the heaviest part on her. Finally, i did some touch ups on her sprite , making the front hair more flowey( going left to right subtly) and making her bounce on her feet.
Idle animation
In this project my main focus is the artistic portion of it, I want it to look as polished and well made as I can for a demo to demonstrate my ability to adapt to new art forms (pixel art) and to show of my skills. To start of with I used my plot to create on of the main characters (the tank ).I took inspiration from magical girl amines with electric type of powers for this character. She also is based of a blue-bottled jelly fish (the neon blue accents and the jelly fish cut trousers). My main color pallet is blue, yellow and blacks. I gave her a muscular build to show the fact that in realty she is a war torn solider who now looks like an anime girl , to keep this idea going she is the only character to not wear a skirt, naturally this shows us that the solider despises there looks meaning they want to go home no matter the cause. I gave them a mini gun since most tank characters (examples being Orisa from Overwatch and Heavy from Tf2) have them.

Coding
body parts separated
To make it so she does the idle animation when she doesn't move I put in this code in the the Obj_tank. The code means when no keys are pressed she will play the idle animation until she is moved or hit by an enemy.


Idea mood board
Waking animations
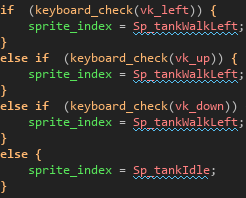
For my next move with animation I wanted to create a simple sprite walk. The walk shows how cold and calculated she is by holding the gun in a steady positions , being light on her feet and crouching to stay alert. By doing this I have crated personality in her design only , not needing words or action to demonstrate what kind of person she is. I have improved on my walking animation by creating two sprites , its the same animation but flip so she can walk left to right more smoothly.By adding the code below i have made it so when u press the left arrow key she will use the left walk animation and when you stop she will go back into idle.
This stage was a bit difficult due to the animation and coding at the start looking a bit broken and stiff, but after using what I learnt with the sprite index I figured out to code the different left and right walks into the actually arrow keys to make it ore smooth. Feed back from my teacher also said to make the sprite flip and follow the mouse to make it more natural , i imputed this feature in the video below to demonstrate how much of a improvement this has made. I the main reason I wanted the feature was due to my inspiration for the art and walking style being ormori's simple yet cute graphics; using there flipping feature to make it more unique.

walking animation

code for sprites
Hurt animation
I found this part some what difficult. Finding the correct code to make the red mask appear took a while but i'm happy with the result in the end. To improve for next time i will see if i can add a simple sound to indicate the player was hurt.
Hurt animation
Continuing with the new sprites i have decided to emulate the game Cult of the lamb by having my own hit animation. This animation shows how the character is quite tough by just simply flinching when hit; this shows the player that the character is tougher than the others and doesn't react to a lot of things. I re used some if the walking animation so she is still in a crouched position but made her legs bouncy a little. i made her blink to show move movement when she snaps her her to the right. To add more detail i made her bangs lag behind her to show natural movement.By using the code above i created a simple red mask over the sprite whenever an enemy collides with them. This done by setting the sprite index to when enemy collides play the hurt animation and having an alarm play which makes the character turn red .

code for hurt animation

Shooting animation
Shooting animation

Code for shooting animation
To improve my sprite work even more I created a sprite that plays whenever you shoot the enemies. This works by coding the sprite index into the shooting mechanics. Stating when ever right click is pressed also play this shooting animation. The main reason I did this was to build on the character with body language, this character is showing they have a lot of will power and don't get fazed with a lot , I wanted to convey this in how little they react when they shoot given a cold and calculated glare.
This part was easy due to the fact I am used to using sprite_index's to add my animations into the code. I reflected on feedback from my peers and re-coded the flip animation to look smoother when she turns to shoot. I did this by adjusting the sprite size in the editors so it wouldn't get smaller when shooting whilst turning.
Death animation
Finally, for my animations i have created a simple death animation. I did this by using the assets from my old layers and adding some extra details (the purple shadow on her face). I wanted this animation to feel heavy ; this would create the impression that this character despises losing and feels distraught when betting, they don't get sad or angry the just slump down and think. I wanted to convey this with the stiff movements from her gun and the way her head snaps forward when reaches the bottom. To achieve this after i used the Pixel Art program i imported this as a sprite and and object by doing this i have a separate sprite. I then created a blank room and placed the quit button at the bottom and placed her (Obj_death) sprite in the middle. To make sure she wouldn't repeat this animation over and over i added an animation end to my object and made an image_index to the second to last frame to pause it. I did the same with the game over text

Death code
This part was mostly easy , the drawing portion while it took a bit was to my liking my only issue was the animation kept playing but now that has been fixed i'm happy with y work. To improve i would like to had some sound affects to elevate this death screen by given it a sad tone.

Death animation
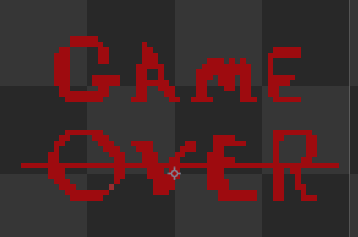
Game over text


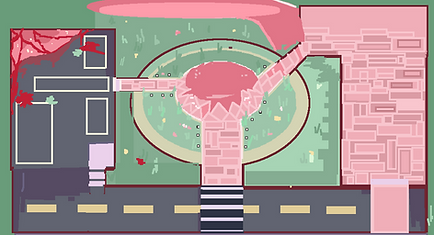
Background plan

Next i Created a base layout of the flooring. This is just the main background that has no collision on it. I was inspired to make a manga inspired city with a pinkish color palette to emulate the cute and cartoon like world they are trapped in. But i have added a subtle slime den at the corner of the car park to show were the smiles are spawning.

I then added a frame around the city ark as a simple barer and path way for players and enemy's. I added collision walls around it to make it a working barer.
Background
I first started a basic layout on were I wanted certain paths to be and a rough idea on what it looks like . This helped in my process because i didn't have to worry not meeting my idea due to it being planed out earlier.
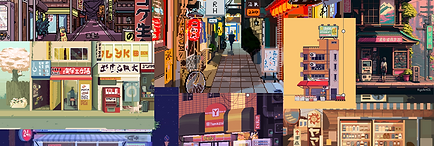
city mood board
To improve on my background i added a tree to create immersion by having the player and enemy's go around it. I did this by making the tree an object and placing it as the top layer in the background objects, but to make sure they didn't walk through the base of the tree i added collision walls around it.


Finally , i added all of the objects together : including boxes, lamp post, buildings and benches. Then a dded the collision walls around each if the items above with small little easter eggs such as you can slightly go into the open door in the yellow building to hide. Then added everything together. I found the background portion easy artistic wise but it too a while to get it to my liking. To improve for next time i will add more detail and clean up with work with the slime residue and parking lot.
Menu screen
Video of menu screen
This stage of the production was easy to implement and i'm quite happy with my end result due to it looking clean and having simple yet effective animation. To improve for next time i would like to add some background sound with the menu to elevate the experience of the player.
To make my project more presentable and better I created a simple menu screen. This was done in Game Maker by creating a new room and making it the parent room, I then edited the sprite and made a cute but simple skyline view of the town they are in . I was inspired with this idea from the game Terriaria on there changing sky line view of the trees. I also took inspiration from my mood board for my background. I animated my menu to demonstrate my ability to animate and make a simple city view more interesting with the fluttering cherry blossoms and the blinking lights in the windows.

Inspiration
Buttons
To make this menu playable i started to code in the buttons. But before that i wanted to create a plank to "hold" the play , how to play and quit buttons. I went into Game Maker and made a new sprite -Sp_board- and did a simple animation of it moving up and down slightly , as if it hovering. I did this to make my game look more high quality and to corroborate with the theme of my game.

Menu board


Button code
To create the code for the buttons, i had to make a new object, which was called Obj_button. After doing this I made this code that makes a draw event. Then i made this a parent object and made the play, quit and how to play their child object. I then inherited the events on all of the children and changed their variables. Example is the play event will send u start to the level when pressed.
Play button
I created a simple yet cute animation for both buttons. The play button has this mystical feeling with these complimentary colors together which matches with my theme and tone of the game. On the other hand, the quit button is cover in blood to indicate that this is a dark game and a subtle way to show that things aren't what they seem.
Below shows a how to play screen, this was important to add since it will help new players understand what they need to do in this game
Quit button

How to play button
I found this task somewhat easy due to the animation being simple , yet it took longer than I anticipated. To improve for next time I will clean up my how to play screen to make it look more presentable.
Finished menu

My unique mechanic
A healer
This is my unique mechanic for my 2D project. Its a healer hat follows you around that you need to protect to be healed when your low on health. This idea was inspired by the game Marvel vs Capcon 3 (PS3) with there friendly help mechanic were one of your three team mates will do a small attack to help you in your 1v1. Story wise this would also be a solider turned magical girl but they would have different personality's.
Code

I was inspired from the magical girl style of healer characters. She has the lose appearance of a nurse - the hat and the apron- unlike the player this solider is more happy go lucky hence the bouncy movement when they float and there heart shaped motif. Her main color pallet is lime greens pinks and whites demonstrating that kinder nature. I would imagine in the main story this character would rather run away from the fights and look for ways to go home rather then spend time fighting.
To code in this healer i inherited the enmity parents code that follows the player and removed the attack and adjusted the sped so she would lag behind - to give the impression of floating- I also had to fix her image_scale since she would get smaller. I then copied some code form the player sating when , hit take damage and given the healer there own smaller health bar (not visible). Lastly i added the import piece of code the ability to heal the player when their health is at x amount of health and to add y amount of health to it.
Art

Inspiration mood board
I found he last part of this project simple the coding didn't take to long however next time ti improve i would like to animate and improve the sprite since i didn't want to take to long drawing her just o not be able to put her in the game. Feed back from peers suggested that i increase her health given to the player. Next time i will do that to make it more of an incentive to keep her alive , or even remove the health packs.